Wednesday, 25 July 2012

Winging it!

Spurred on by the replacement of the bulkhead, I decided to turn my attention to the wings and start to return them to a renovated standard.

The OS wing, like the NS wing is not too bad with most of the repair needed on the inner wing where various bolts have corroded and widened the holes. These will need some repair but can be reused with the use of larger washers to help create a hold.
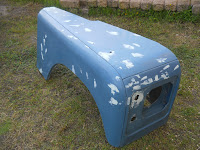
OS wing with filler repairs

I took away a layer of paint, road film and surface imperfections with 240 grade wet and dry. I then mixed some filler and flashed in  any slight surface dents and blemishes. Luckily there has not been a build up of years of bad paint jobs as the paint was still the original layer.

I dare say I could have got away with the primer filling in the surface blemishes but I wanted to make sure that the surface is good.

I will leave this to harden and tomorrow take the filler back with 600 grade and ready it for the primer.

Tuesday, 24 July 2012

The Incredible Bulk (Head)

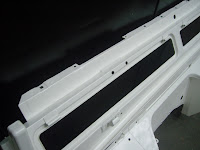
The finished article
Well this last weekend saw a trip south to collect the bulkhead from Dave at Prestige and Classics in Manchester.The work done by Dave is truly first class and I spent quite a time looking at it with starry glazed eyes, the kinda of look reserved initially for Anita Harris all those years ago (if you don't know who that is, then you shouldn't be restoring a Series 3!) The colour is Marine Blue and it is the original colour spec for the factory standard colour from 1957 - 1985 and the code is JCC LRC.006 . 


The item was then carefully bubble wrapped and loaded carefully into the back of the family estate alongside my bemused young son who shared the back of the car with it. Believe me a game of eye spy with a four year old when it always started with 'B' and was always 'bulkhead' on his turn, made for a long 256 mile trip!


Eventually we made it back and tonight I managed to lower the bulkhead in place and bolt it up. I had ordered two new bolts for the job from Craddocks but unfortunately they were slightly too wide a diameter so the original bolts were used.


The cockpit complete
The Engine bay side.

The only downside was a couple of slight scratches that were made on the lower posts as it was carefully persuaded into place, but luckily they were only surface wounds, the powder coating still in tact and nothing a slight touch up wont sort. It is after all a Land Rover.


The next job now is to rub down and paint up the front wings and the floor panels. I have left the gearbox tunnel top plate, that joins the bulkhead to the gearbox cover with Dave to refabricate as this was quite shot at and I think a couple more pieces will find there way south before the end of the project, one of which is the front radiator panel which, like most is shot at, at the bottom. (If your reading this Dave, be warned!)


I am no way connected with P&C but just lucky enough to come across such a superb craftsman and I have no problem in blatantly plugging Prestige and Classics on this blog if it helps someone else to restore their Landy.

Saturday, 14 July 2012

I know it's been a while but things have been happening in the background. My time has been spent sourcing a new bulkhead and I came across a great guy, based in Manchester who restores classic vehicle parts and produces some great pieces. A quick email later and photographs of a series 3 bulkhead being restored were sent to me. Dave at Prestige and Classic, produces a lot of parts for classic cars, the old Triumphs, landrovers etc. and is certainly knowledgeable on parts, design and use.

NS Footwells

OS Foot wells
Completed before powder coating


Taking sourced parts, they are assessed, sandblasted and reconditioned to above factory standard. Next they are powder coated and the finished articles are certainly of a high quality, ready for painting and refitting. 


Top rail
Internal bulkhead


Engine side.


These are completed photos of my series 3 bulkhead. Ready for collection next week


The communication with Dave is great, keeping you updated on the process of your ordered parts. If you are in need of parts for your landy then a call to Dave at Prestige and Classics would surely be a good place to start. I have been impressed with the service I received! 


Dave can be contacted here and please mention this blog when contacting him.


Wednesday, 6 June 2012

Beavis and Bulkhead

After a break of nearly a week, I was able to get back into the barn and complete the removal of some more of the electrics and wrestled with how some of the wiring was connected through to the bulkhead. I also made the decision to cut some of the wiring out and start fresh. I can see a new loom going in, but more about that later.

Bulkhead still in place
This evening, armed with a fully knowledgeable operative, who himself is restoring from the ground up a series 3, I was able to continue towards the goal of removing the bulkhead. After removing the floor panels, (which took a bit longer due to a long conversation about the authenticity of a rebuild when using stainless steel bolts, but we digress), we were then able to undo all the bolts holding the transmission cover. At this point we both agreed that this was the first time that we had seen blue tac used as a sealant (We kid you not!)

The steering shaft was then removed after a hairy moment when the steering box cover was removed along with an open bearing that will be replaced upon refitting. The wiring for the gas switch was carefully removed and temporarily refitted but will be rehoused within the dash console to help provide clean lines.

At this point we were rewarded with the two main bulkhead bolts either side of the vehicle  offering very little resistance. After a final check along the inside of the bulkhead and the removal of the brake bracket and the final securing bolts, we found ourselves ready  to lift the bulkhead clear. 

Bulkhead removed
Without the option of a 'brew' and the opportunity to reflect, we had no alternative but to lift the bulkhead, which I am pleased to say went without fault or mishap. The extent of the rust was now clearly visible and the decision to remove the bulkhead was vindicated.


This is a turning point for the project as the main aim was to take out and replace the bulkhead and rebuild from this point. 


The project is not a full ground up rebuild but, like most projects, other jobs become visible and I will be replacing the front springs, bushes and dampers whilst I have the chance, along with the steering trackrods and arms all the way back to the steering box.


Many thanks to Lee for the unexpected chance to remove the bulkhead when we did and to Craig, who was on standby but will be needed to help lift in the new one and all the other bits.


Well, whilst waiting for the bulkhead to be delivered, painted and readied for refitting, my thoughts turn to the next job. Whilst the front is open and access is clear I might as well consider updating the steering track rods and ends that I think I will replace whilst I can. 
Monday, 14 May 2012

Dot dot dash

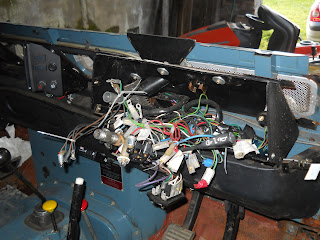
This evening I decided to tackle the dash and control binnacle. This is probably the most fiddly of all the areas on the bulkhead and so armed with my compact camera to record as much of the wiring arrangement as possible, I set about removing the upper dash cover, heater vents and heater controls. The next step was to settle in a remove the control binnacle and carefully log the wiring as each control was disconnected.

The red wire goes to the..... no the blue wire goes to the....
After this I removed the centre console, which was fitted to later series 3's and housed the hazard warning and fog  light controls. 

I have also decide, upon reassembly to house the gas conversion switch control in here as well, re routing through the bulkhead higher up.


I want the dash layout to look as near original as possible and there is plenty of options to add controls without spoiling the authenticity.

Finally for this evening, I removed the wiper motor and gears and the washer tubes, thus leaving the left hand side of the bulkhead clear. I also spent a bit of time boxing up parts.

Wednesday, 9 May 2012

And there off......!

The doors that is! This evening was a nice surprise as I had enough brownie points to get a couple of hours in the barn and work on part of the project that I had been looking forward to. 


Removing the windscreen and the doors brings to an end the major parts  removal and sees me turn a corner. This was a part of the project that I was looking forward to as it now exposes the bulkhead and allows me to end this week with most of the parts now off the vehicle. This last stage was quite interesting as there are quite a few fiddly parts to remove from the bulkhead, such as door stays, windscreen ties and the such that have to come off and should not be overlooked. Still a pleasant evening where you can stay largely clean helped to make it enjoyable.

The roof and back end of the vehicle will remain largely untouched as part of this phase of the rebuild. Once it is back on the road, I intend to eventually replace the van top with a safari top complete with internal upholstery.

Next week I shall be removing the dash and getting to grips with labelling the electrics, removing the steering column and brake master.

I shall also be looking to assess some of the removed parts and start to clean up, rub down and prepare parts to be put back on.


I also need to box up, in a logical order, some of the bagged parts and store them safely.

Inspiration

When carrying out a restoration or rebuild of any kind, it often helps to have a clear idea of what you are are trying to achieve. Today, I found mine. 

Copyright Land Rover Centre.
This vehicle, recently for sale with the Land Rover Centre, Huddersfield, exhibits what I consider to be the closest  to an original spec and features detail that I would like to return mine to, namely the wing mounted 'wing mirrors' and the central number plate position. Small features such as the chrome hub cabs help to add a level of authenticity to the vehicle.

The Landrover Centre can be found at www.landrovercentre.com

Tuesday, 8 May 2012

And the band played on....

Well another lovely sunny evening spent in the barn continuing the strip down. The evening was really successful as the LH wing was removed, the grille plate at the front along with various 'internal' parts such as the heater box and air intake. 

This was followed by various gromet housings and parts fixed along the bulkhead. My plan is moving left to right towards the fiddly brake housings.


No where can I find half a boat for the rear...?


The next step moves onto the windscreen removal, doors and some of the internal fixings that bolt onto the bulkhead. At this point, it is time to take stock and update my list of parts and replacements that are needed.


The galvanised bulkhead is now on order.


 All good fun!

Friday, 4 May 2012

Redbull gives you wings!

Redbull may give you wings but a socket set removes them! Yes, the surgery continues as the reluctant bolts are removed and the parts come away. Two hours this evening saw the bumper removed and placed in the 'skip it' bin. 

The left wing was slowly removed . 

There are a few bolts to remove on this side,and the amount will differ depending upon the engine variant and the model, series 2, 2A or 3. On this one, these include the wing to bulkhead (4), wing to front grille (4), inner wing stay (1), front sill stay (1) a couple of wiring harness clips (2) and the bonnet arm clamp (3) . The rust has taken its toll on these and they all will be all replaced with new. Thank god for penetrating spray!

The footwell rust becomes clear
The decision to remove the bulk head was the right one as the extent of the rust and decay is becoming obvious as each layer is peeled away. The good thing about removing the front is that you can also get better access to the chassis, dampers and springs that will all be replaced as well.

Also stainless steel bolts look a no brainer on the rebuild. Its worth taking your time and enjoying the strip down as there is very little option otherwise.

Next job, the other wing and the front grille plate.


Sunday, 29 April 2012

Rusty Bolts!

Today saw the work start in earnest with a couple of hours free this afternoon, I spent the time in the barn starting to remove some of the parts so I could assess whether to keep or bin. 

I have decided to remove the bulkhead as it is outwardly 'shot at' in the usual footwell areas and the upper posts and economically the time spent on it would not be beneficial and I have managed to source a galvanised one.  A fellow landy nut is going to help along the way as we near the bulkhead removal. Advice from others is a great resource.

The plan is to start from the front and work backwards to the bulkhead. Unfortunately the demon rust had  taken its toll on some of the screws and bolts and the plastic grille was the first casualty. At this point I have also decided to replace, where possible screws with stainless steel ones and a good source is landyscrews on ebay. Very good and a quick supplier. 

Doesn't look a lot done but there is!
Removing the headlights (binned) also brought with them rusted headlight bowls and the parts added to the 'to buy' list. 
The sidelight indicator lens have been saved, bagged and labelled. Bagging and labelling is a must in any renovation as it will save time when rebuilding when its guess the part! The sidelight holders are just sat in at the moment and will be taken off as the next stage is to remove the wings, bonnet and front bumper.


A nice way to spend a couple of hours and also a great way to get to know the vehicle as the parts list grows.

Saturday, 28 April 2012

The work starts!

Well after a slight delay in getting started,the Land Rover has been moved to its new barn where it will be undercover, dry and the work can begin.

A sunny day makes all the difference
The last view in her current state.


A Full assessment of the job ahead has been made. Advice sought and taken. Help procured (You know who you are!) and the rose tinted glasses placed in the bin!